Introduction
Deployment
This Userbot can be deployed with four different ways, which are Termux, Heroku, Docker and Legacy way.
Methods of Deployment
Deployment
This Userbot can be deployed with four different ways, which are Termux, Heroku, Docker and Legacy way.
Termux - Run the Userbot in Termux (mobile).
Heroku - Run the Userbot in a cloud application. It's the easy way to use Userge!
Docker - Run the Userbot in an isolated application that doesn't interfere to the system but uses your same system hardware and internet. You Just have to fill mandatory vars and 2-3 line commands to Run Userge on Docker.
Legacy-Method - Using Python and all those packages which are required to Run this bot. You can also say a Manual way to deploy a userbot.
Deploy to Heroku
Fork the Helper Script Repo then Rename your fork with some random names and deploy . Deploy Link will be in Format given below.
https://heroku.com/deploy?template=https://github.com/username/repo_name
Deploying with Docker 🐳
1. Install Docker
Follow the official Docker Installation Guide
You need to clone Userge repository first by running:
git clone https://github.com/UsergeTeam/Loader.git
Go to the working directory by running:
cd Loader
Open & set all the necessary vars in config.env file. For example, the config.env is in config.env.sample:
mv config.env.sample config.env
Then edit config.env with your favorite text editor and save it!
Build Docker image by running:
docker build . -t userge
Run container by:
docker run -d --restart on-failure --name userge_1 userge
Explanation of the command flags above :
-d: (detach) This will make your Docker running even if you exit your console.--restart on-failure: Docker container will automatically restart if there is a failure on the running system.--name userge_1: Custom name for your container, instead of using the container ID, this makes it easier for you to find it.
To stop Docker container, run:
docker container stop userge_1
To get container logs:
docker logs userge_1
Run userge with Docker-Compose 🐋
1. Install Docker-Compose
The easiest way to install docker-compose is:
sudo pip install docker-compose
OR, also you can check other official methods of installing Docker-Compose here.
2. Run Userge
We don't need to clone the repo (yeah Docker-Compose does that for us)
Setup configs (Download the sample config file)
mkdir userge && cd userge
wget https://raw.githubusercontent.com/UsergeTeam/Loader/master/config.env.sample -O config.env
vim config.env
Download the yml file for Docker-Compose
wget https://raw.githubusercontent.com/UsergeTeam/Loader/master/docker-compose.yml
Finally, start the bot
docker-compose up -d
The bot should be running now. Check logs with
docker-compose logs -f
Q. How to Stop the Bot?
To stop the running bot in Docker, use this Stop Command
docker-compose stop
This will just stop the containers. Built images won't be removed. So next time you can start with this command
docker-compose start
It won't take time for building from scratch.
To delete the built image of Bot, use this Down command
docker-compose down
You can stop and delete the built images also. So next time you have to do this to start the bot.
docker-compose up -d
Q. How to Update the Bot?
docker-compose up -d
Changes will be fetched from git repo. You can change Repo URL from docker-compose.yml file.
Deploying with Legacy Method
Requirements:
- Python (Min Version 3.8 & Max version 3.9)
- Mandatory Vars
Linux
1. Install required package
sudo apt install tree wget2 p7zip-full ffmpeg wget git
wget https://dl.google.com/linux/direct/google-chrome-stable_current_amd64.deb
sudo apt install ./google-chrome-stable_current_amd64.deb
Notes: Recommended FFMPEG version is 4.3 or above
2. Clone the Repository
git clone https://github.com/UsergeTeam/Loader.git && cd Loader
3. Install Requirements
bash install_req
4. Create config.env as given config.env.sample and Fill that
cp config.env.sample config.env
5. Get String Session and Add it to config.env
bash genStr
OR you can use this @genStr_bot to get the string.
6. Finally Run the Userge
bash run
Windows
1. Install Chocolatey
Open Powershell as admin and run
Set-ExecutionPolicy Bypass -Scope Process -Force; [System.Net.ServicePointManager]::SecurityProtocol = [System.Net.ServicePointManager]::SecurityProtocol -bor 3072; iex ((New-Object System.Net.WebClient).DownloadString('https://community.chocolatey.org/install.ps1'))
2. Install Other Packages
Only Git is Compulsary
choco install git
choco install wget
choco install ffmpeg
3. Clone the Repository
git clone https://github.com/UsergeTeam/Loader.git && cd Loader
4. Install Requirements
Open install_req.bat
5. Create config.env as given config.env.sample and Fill that
copy config.env.sample config.env
6. Get String Session and Add it to config.env
Open genStr.bat OR you can use this @genStr_bot to get the string.
7. Finally Run the Userge
Open run.bat OR run
py -m loader
Config Vars / Setting Up Vars
Config vars are basically the variables which configure or modify userbots to function, which are the basic necessities of plugins or code to work. You have to set the proper mandatory vars to make it functional and to start the basic feature of bot.
You can leave non mandatory vars for now and can add them later.
List of Available Vars in Userge
Click on any var from the list below to get its detailed description and setup guide.
Mandatory Vars:
Vars Defined for your Mode
Note: These are the minimum required vars need to setup to make userbot functional.
Non-Mandatory Vars:
UserGe has many non-mandatory vars which are used for Extra features.
1. API_ID and API_HASH
Go to my.telegram.org then Enter your Phone Number with your country code.
After, you are logged in click on API Development Tools.
Enter Anything as App name and App short name, Enter my.telegram.org in url section
That's it, You"ll get your API_ID and API_HASH Var.
2. DATABASE_URL
First, Go to cloud.mongodb.com then Sign Up there.
Login or Sign up, if you don't have an Account!
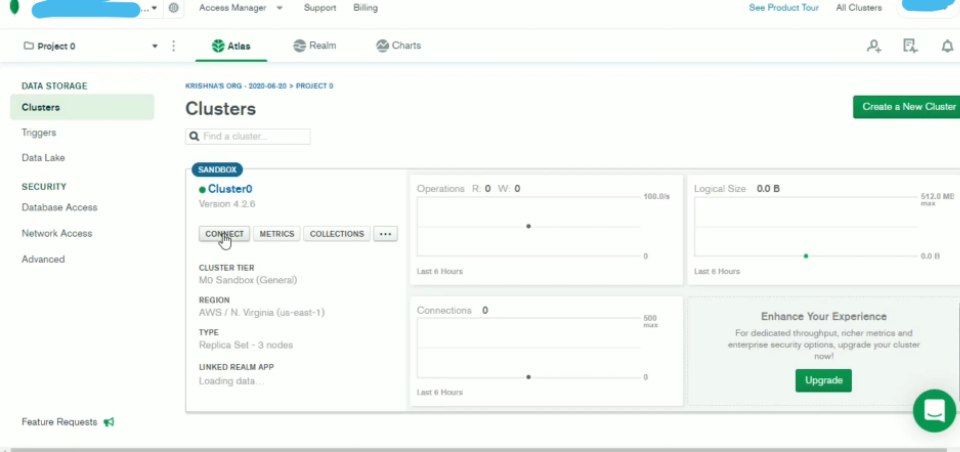
After Login, You'll be on your Clusters Page

Choose an option Build a Cluster (as the shown picture below)
Now, You'll see Pricing Plan section.
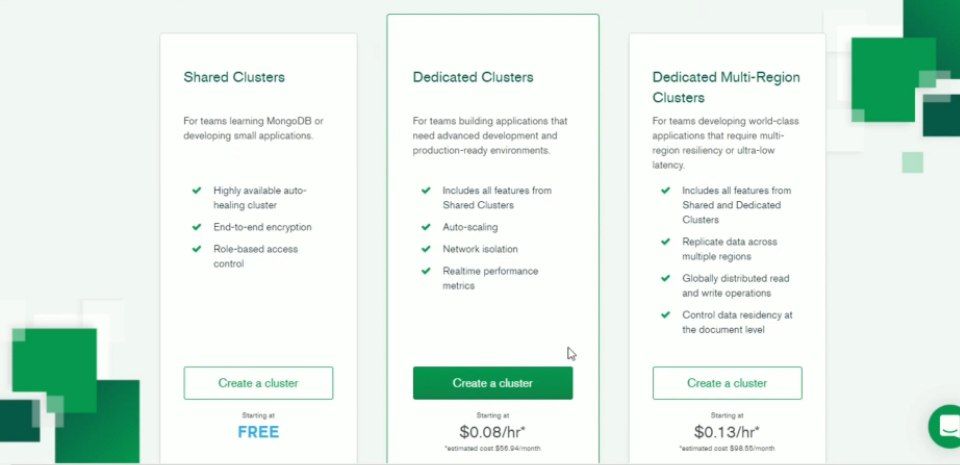
Here, we're going to use free plan for our userbot.
After that, you have to select Region and Server, where your Database server will host.
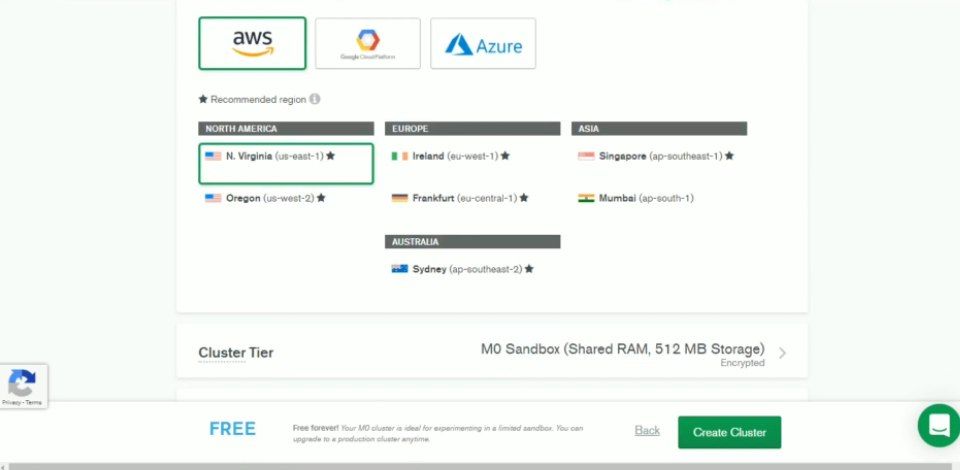
Tip: Select the Nearest server from your location so it won't take long time to connect
- At last, Click on Create Cluster.
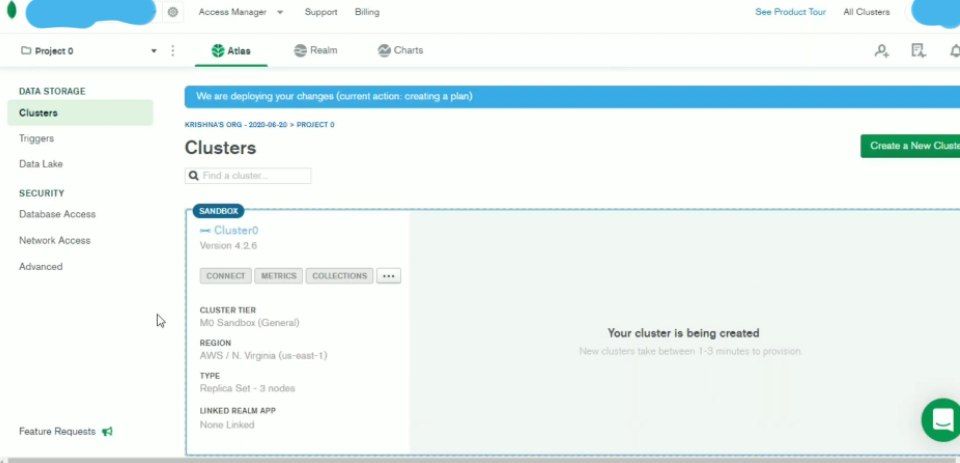
You have to wait for some time at this Page while your Database is being created.
After Created, Click on Network Access (Can see this option under Security section of Above Image)
You will see an option Add IP Address. Click on that.
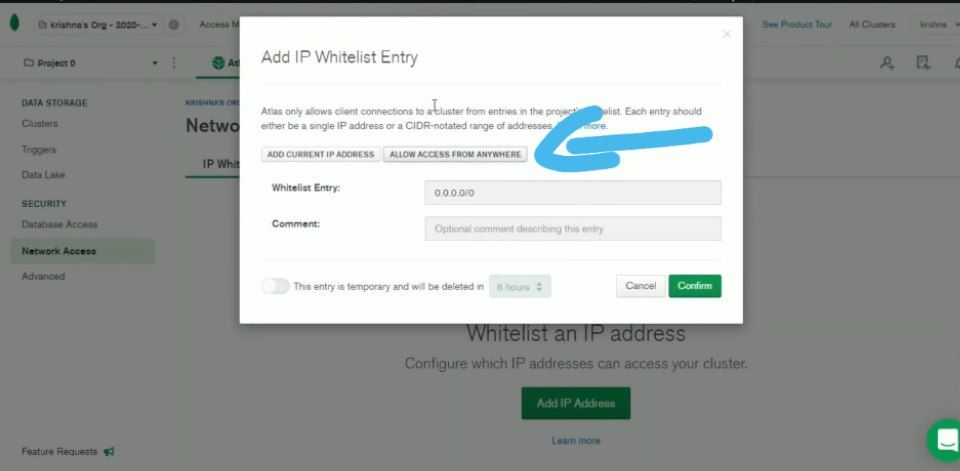
Now, Allow Access From Anywhere. Then Confirm.
Wait until the Status changes from Pending to Active.
Go Back to Cluster option and Click on Connect.
Now. Fill any random Username and Password
NOTE!
Don't use Special character in your password like @#$% etc.
After filled, Click on Create MongoDB User.
There you are, Select Choose a connection method
Choose Connect Your Application
Now, Select DRIVER as <code>Python</code> and VERSION as <code>3.6 or later</code> then Copy the Database link Shown below
mongodb+srv://<username>:<password>@mongos0.example.com/myFirstDatabase?retryWrites=true&w=majority
- Replace
<password>with your given Password andmyFirstDatabasewith "test" or "cluster0" and remove<>symbols.
That's it. You have got your DATABASE_URL Var value.
3. LOG_CHANNEL_ID
Here, You need Log Channel ID to get all logs and Traceback errors of your UserBot.
Create a Private Channel on your Telegram.
Type and send any Message on your channel.
Now, Forward your Message to @ShowJsonBot.
Bot will send you json formated data of your message.
Find "forward_from_chat" section in the message. you'll see the "id" starting with <code>-100.....</code>
Copy the id with included hyphen (<code> - </code>) and Paste into LOG_CHANNEL_ID Var.
Note:- Don't forget to add your Bot as administrator in log channel.
For more information... Watch this Video
---- [Optional] ----
Instead of making Channel, you can also create a Group to get your logs and this is the very easy way to get. Let's Do it.
You just need to make a new Private Group on Telegram.
Add @MissRose_Bot in your Private Group from Add Member > Search "@MissRose_Bot" and then Add.
After added, Just type "
/id" in the chat.You'll get the ID of your channel or group.
Note: Changing Group Type to Public may give you an issue in Userbot. To Fix this, Put Public group ID in var.
Non-Mandatory Vars
1. CMD_TRIGGER
Command Trigger needed to trigger your userbot in User mode to execute your command. This can be only set as one Symbol (Special Character)
eg. !
2. WORKERS
Set the number of workers count you want, Defaults are currently depends on CPU Cores, Basically, It's the number of CPU Core.
3. RSS_CHAT_ID
Telegram chat ID for post updates of rss feeds if you have added feed urls.
4. G_DRIVE_CLIENT_ID & G_DRIVE_CLIENT_SECRET
This Vars is used for Google Drive Feature. If you want to download or upload your files and document into Google Drive, you must set this var value.
So, Let's Start
- Go to console.developers.google.com and Sign In with your Account.
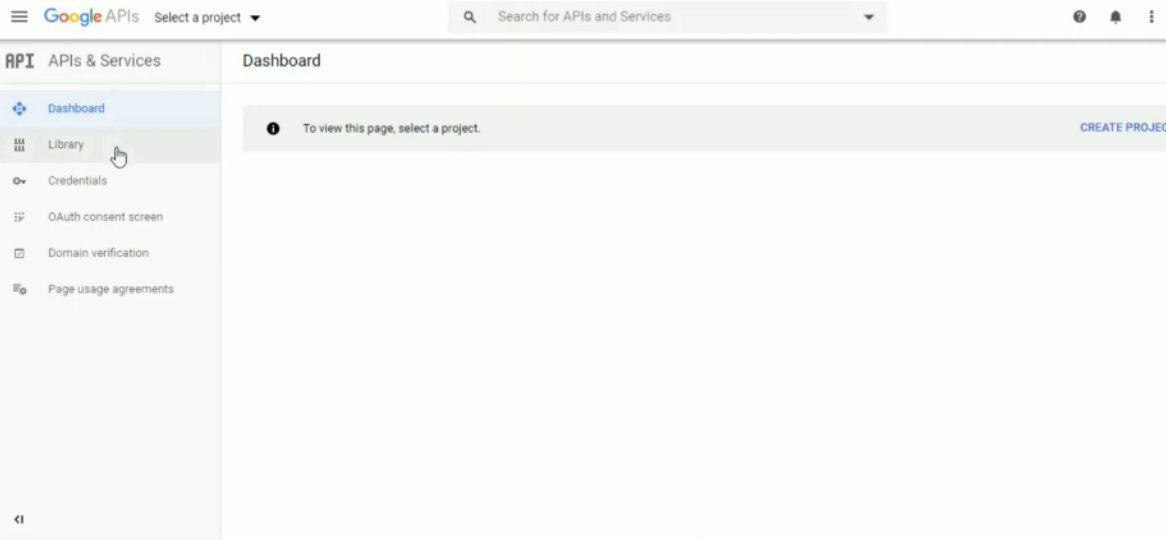
You'll see the Dashboard Page.
Now, Search "Drive API" in the top of the Box.
Select Drive API and Enable it.
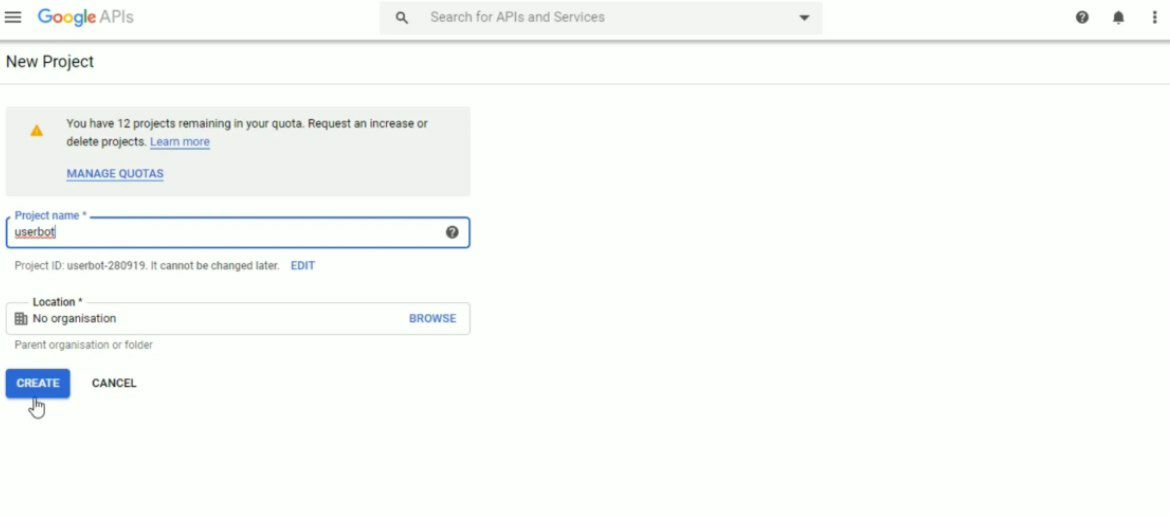
- Give a Name of your Project and Click on Create.
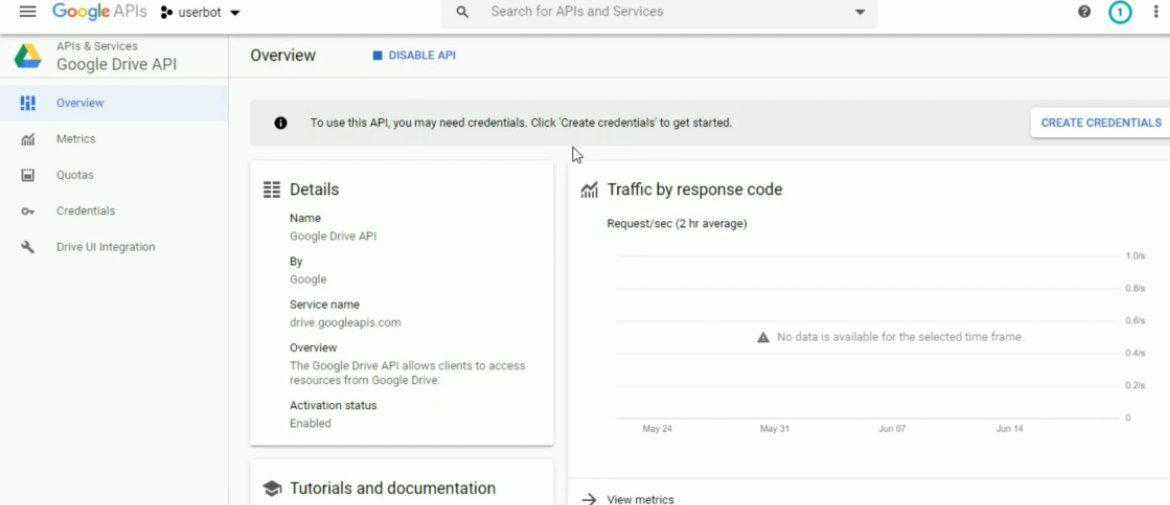
- At the Right Side, You'll see Create Credentials option. Click on it.
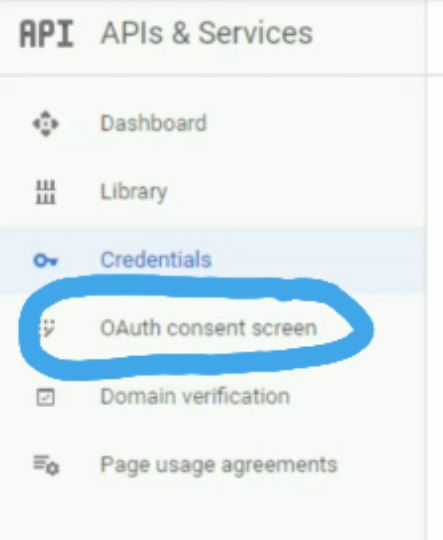
- Click on OAuth consent screen option.
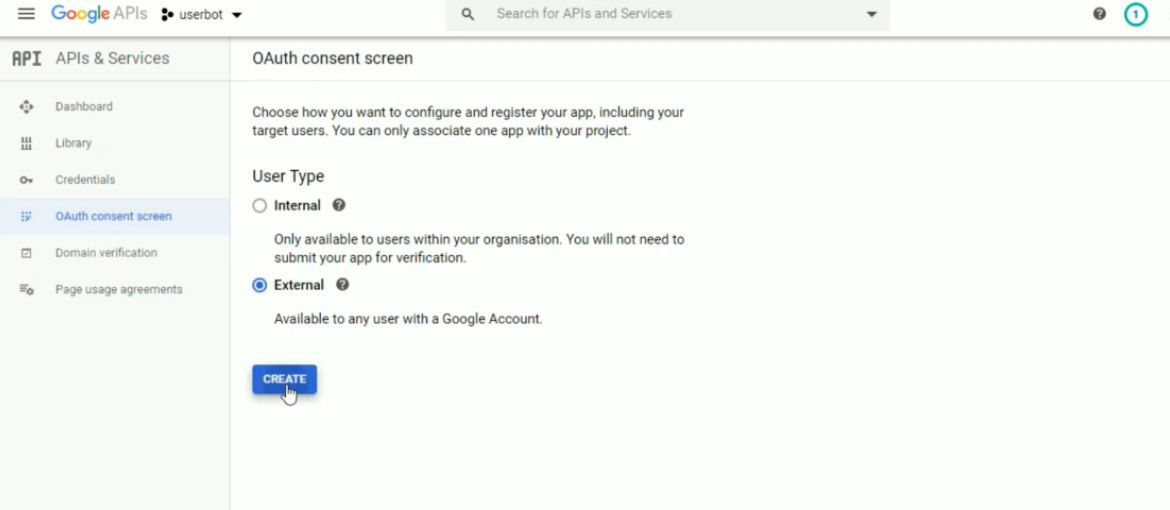
Select User Type as External and Create
Give a Name of your Application and Save
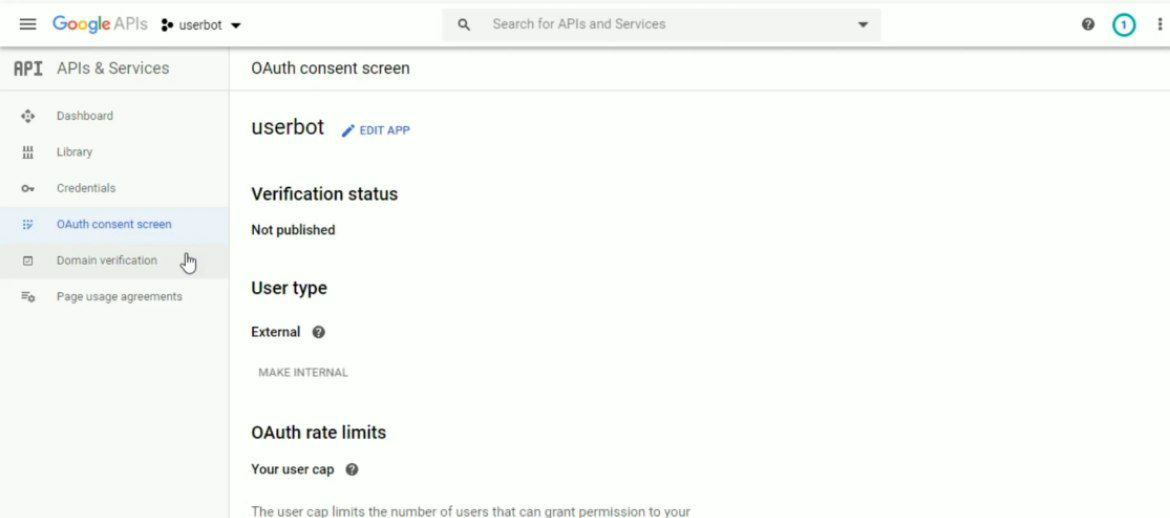
- You'll see OAuth consent screen dashboard page.
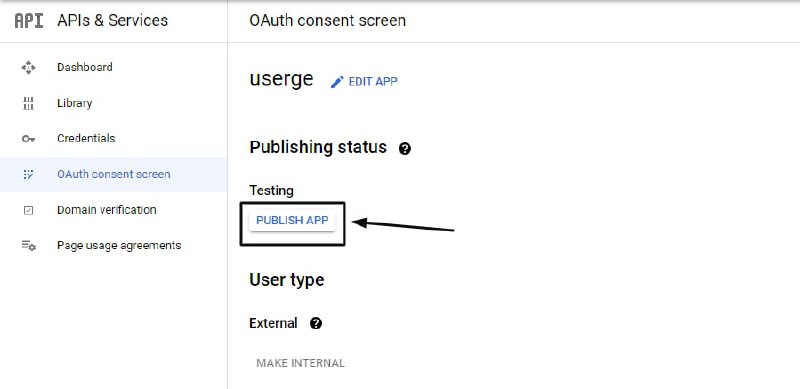
After that, Now time to Publish your App Click on that.
then Confirm, Now start creating the API Keys which we use in Userge.
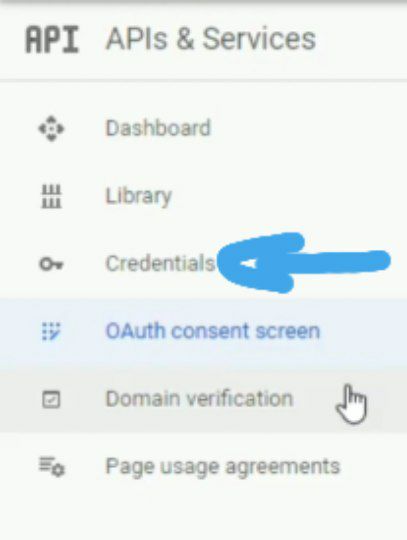
- Now, Click on Credentials
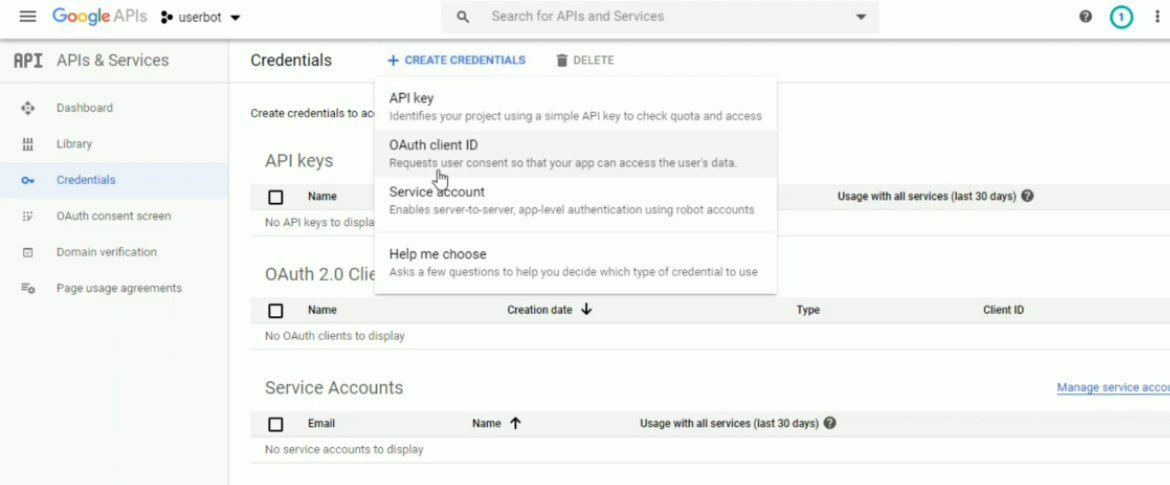
- Then, Create Credentials and Select OAuth client ID
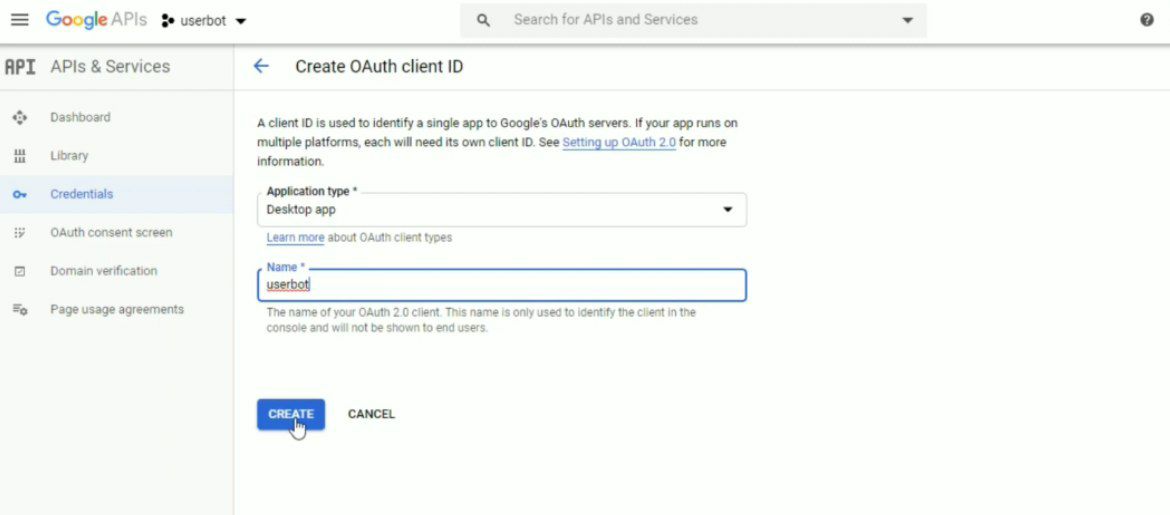
- Choose Desktop App and Click on Create
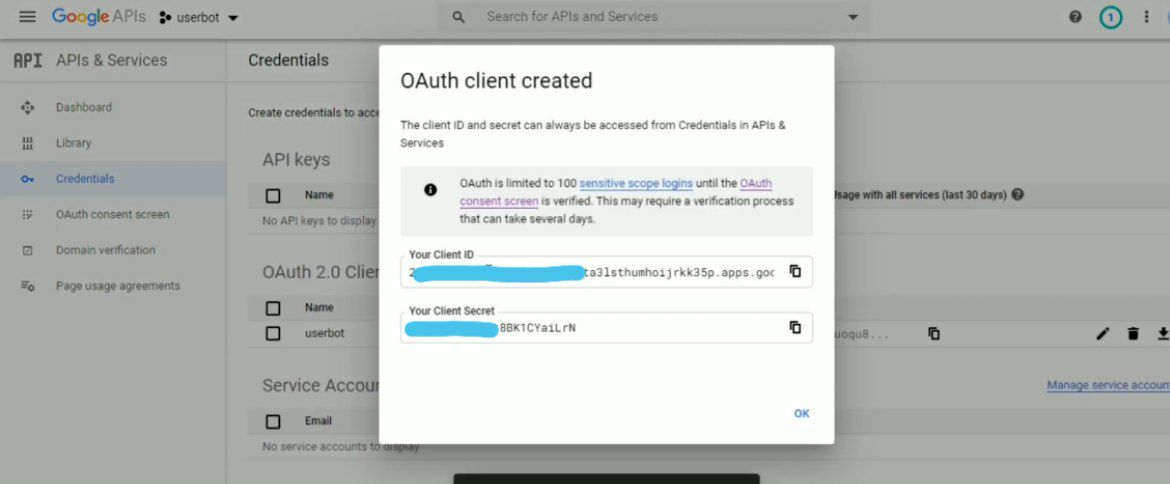
- That's it... You have got your both G_DRIVE_CLIENT_ID & G_DRIVE_CLIENT_SECRET Var.
5. G_DRIVE_IS_TD
If you are using Team Drive (TD) then set this value as True. Otherwise leave as it is default. To know more about TD, You can find it on Web.
6. G_DRIVE_INDEX_LINK
If you have created Google Drive Index, You can use it as well to output the Index Link after Uploading the file to Google Drive. Just fill your url into the value.
eg. https://example.example.workers.dev
7. DOWN_PATH
You can rename the directory of your downloads folder. by default all your files will be downloaded in "downloads" folder.
8. PREFERRED_LANGUAGE
Select your preferred language. For example: If English value will be
en
9. CURRENCY_API
This var is used for Currency converter & Exchange Rate in Plugin. If you don't want this you can leave this var value blank.

- Click on Get Your Free API Key.
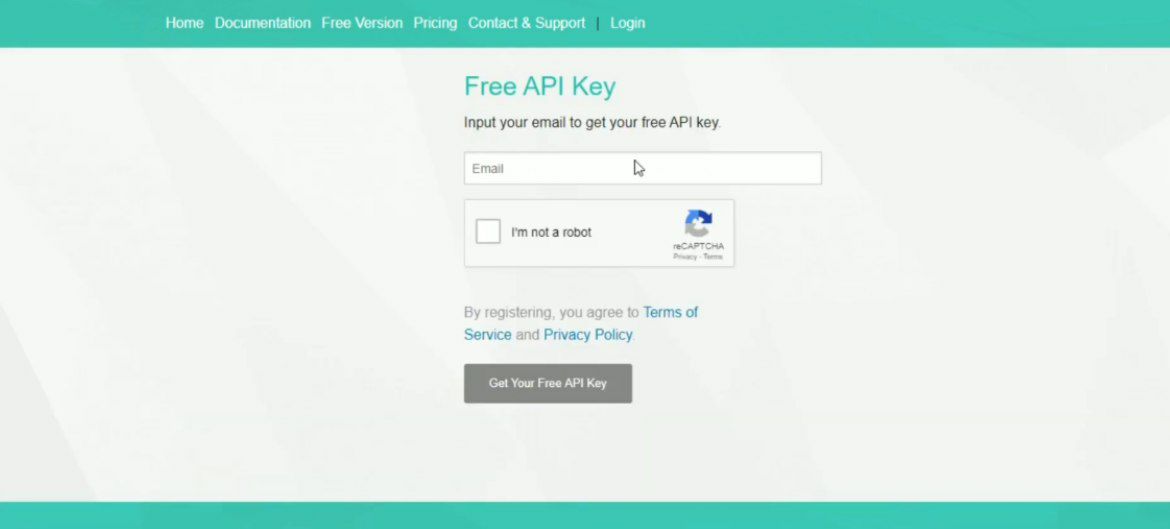
Now, Enter your Email Address, Check the Captcha.
And last, Click on Get Your Free API Key.
That's It... Check your Email, You have received the API Key there. Confirm your Email Address and Fill the API Key in Value.
10. OCR_SPACE_API_KEY
OCR is used to read text from the images. You can also use OCR to read text from the image on Telegram from your Userbot. It helps you to copy texts from Images.
So, Let's start getting the value of this var
Go to http://eepurl.com/bOLOcf and Fill your details.
After fill, Click on Subscribe.
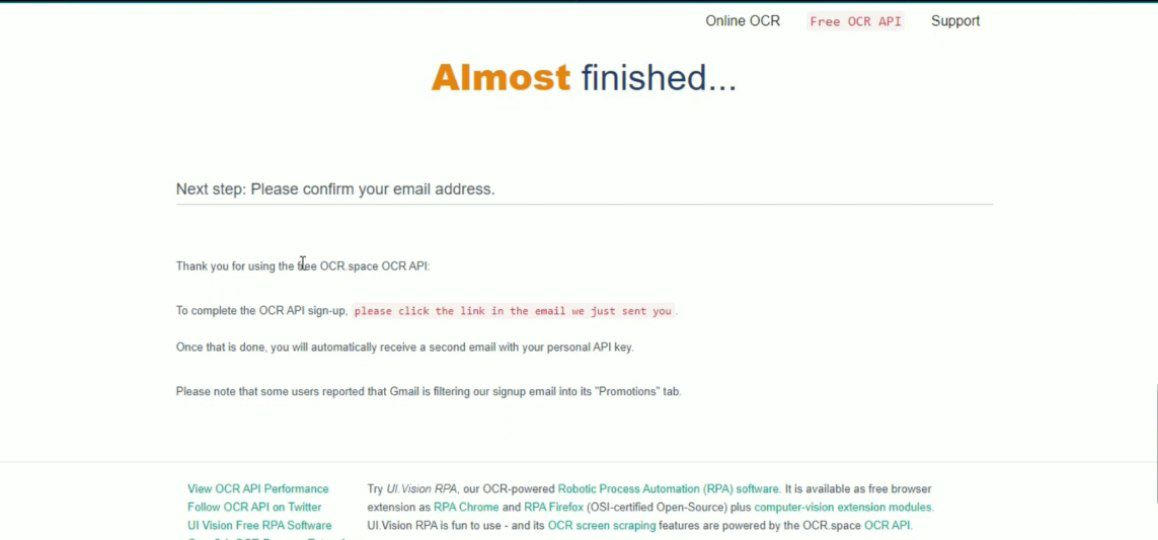
That's it, Check your Email Address to get your API Key.
Copy API Key and Fill in the OCR_SPACE_API_KEY value.
11. WEATHER_DEFCITY
To know Weather detail of your City, State. This value is required with OPEN_WEATHER_MAP var to work, you can also skip it as it is not mandatory.
Add Default city value for weather details,
eg. Delhi, India
12. USERGE_ANTISPAM_API
This is a var for Userge AntiSpam project. If you use this var, it bans banned/muted users in Userge AntiSpam in groups where you're an Admin or Owner.
Get your personal token from @UsergeAntiSpamBot in Telegram.
13. SPAM_WATCH_API
Basically, It has a list of Spammer and they are listed in SpamWatch. If you use this var, It bans the SpamWatch banned users in the groups wherever you are at Admin or Owner post.
- Get SpamWatch API from @SpamWatch on Telegram.
14. OPEN_WEATHER_MAP
As, If you are going to use this userbot also for checking Weather detail on your current City, State. Then, this var value is required to be filled with WEATHER_DEFCITY var to work.
- To get Weather API, visit openweathermap.org.
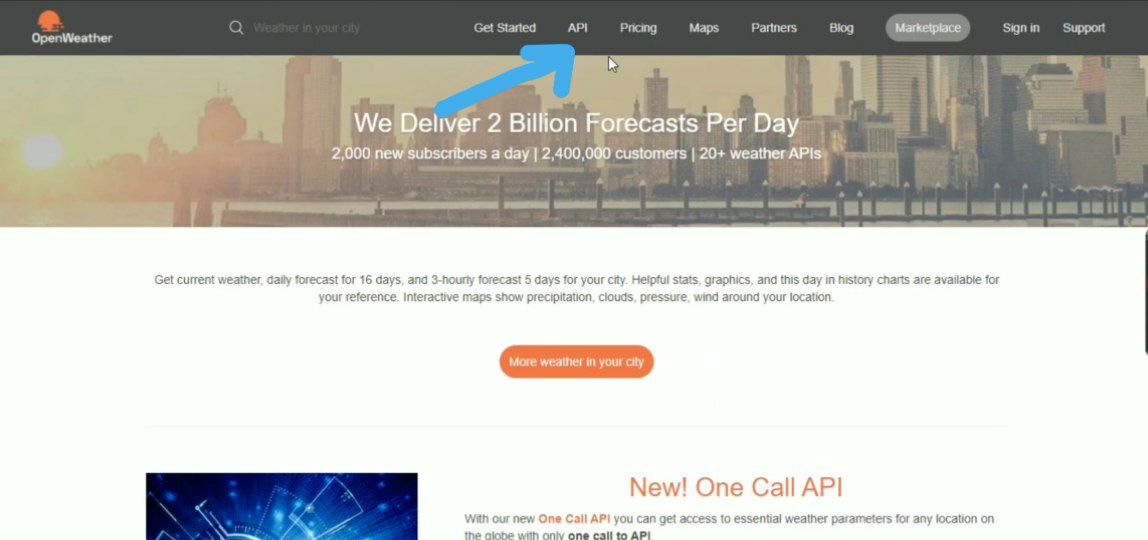
- When you open the url page, you'll see the API option on top.
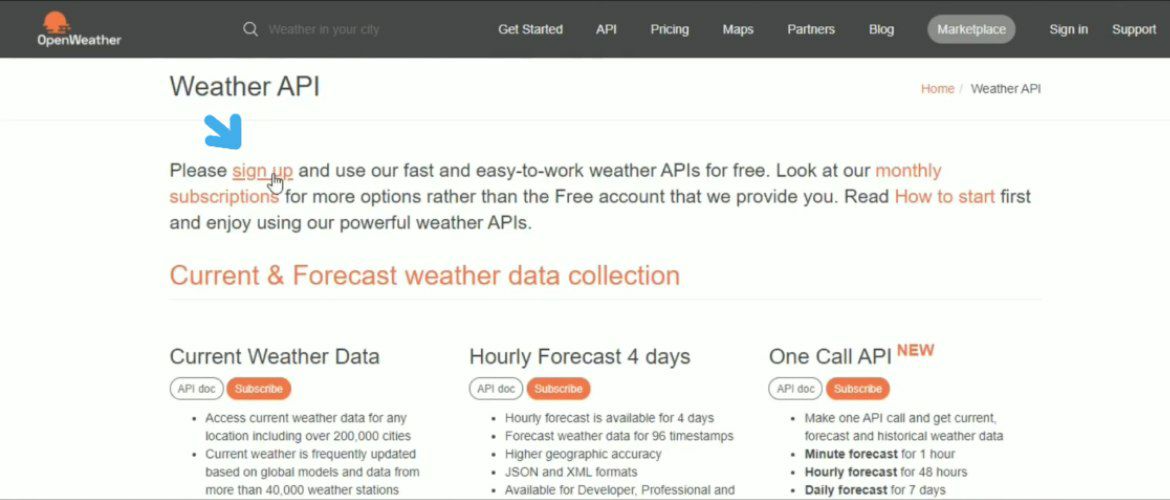
- To Get API Key, You must Sign Up to the website.
For signup, you must be at least 16 years old.
- After successful SignUp, You'll see API Keys option, Click there.
- That's it... You have got your API Key.
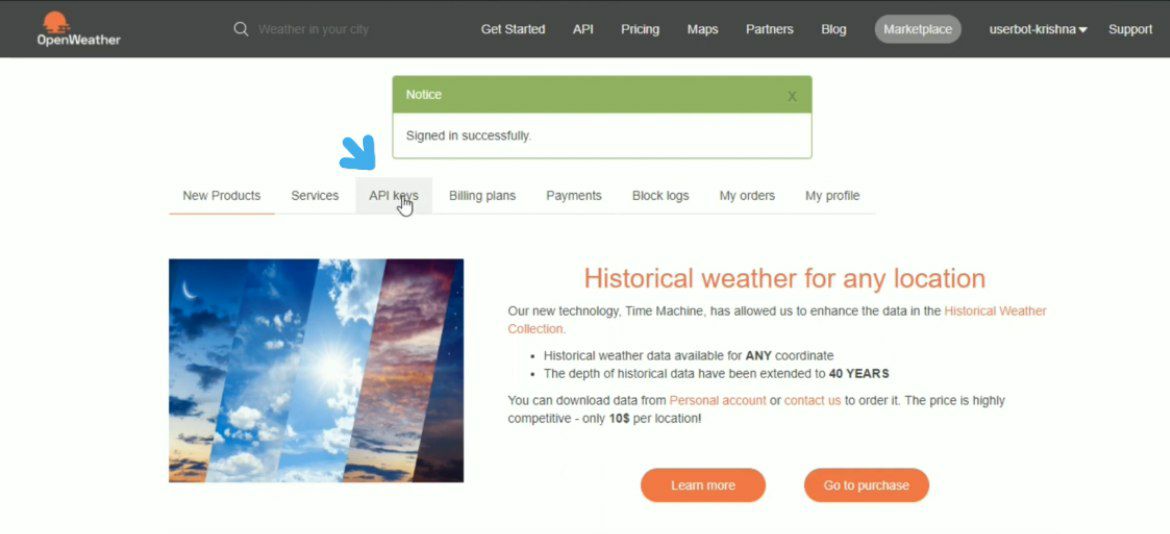
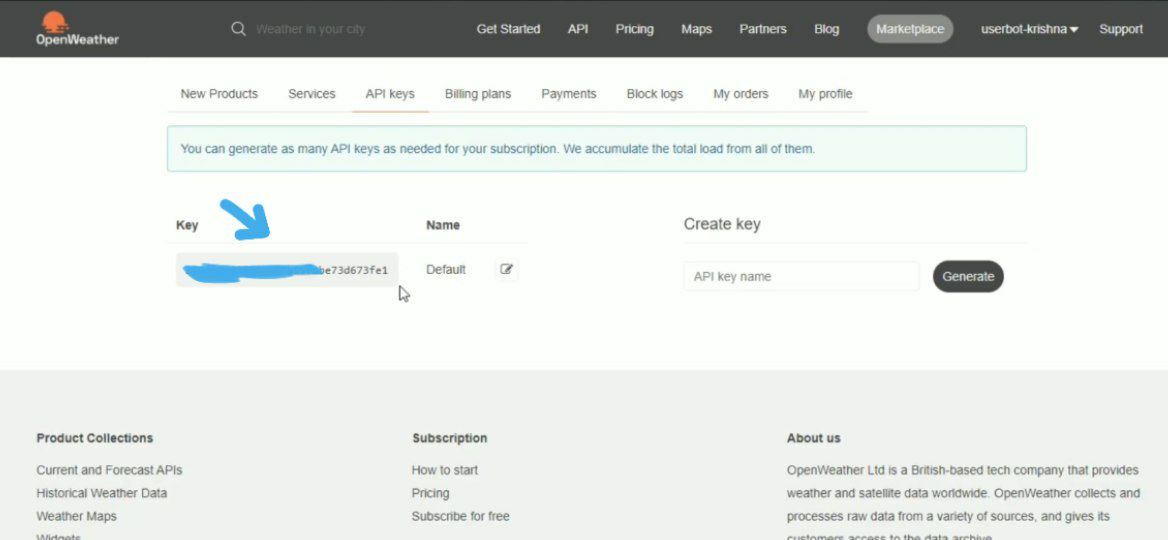
15. REMOVE_BG_API_KEY
This API is used for the Removing the Background from Images (removebg module).
So, Let's start getting the value of this var
- Go to www.remove.bg/api.
- Click on Get API Key, and Sign Up to the website.
- Click on API Key tab option. Then Click on Show.
That's it... You have got your API Key.
16. G_DRIVE_PARENT_ID
You need to enter the Folder Id of Google Drive. If you want to use Google Drive module to Upload or Download files from your Userge userbot.
For detailed Guide for getting this value can be found here.
17. ASSERT_SINGLE_INSTANCE
This will assert that there is only one running Userge instance to prevent from AUTH_KEY_DUPLICATED error.
18. SUDO_TRIGGER
SUDO Trigger also needed to trigger your userbot to execute command whoever you gave sudo permission to use your userbot or trigger your bot mode. This also can be only set as one Symbol (Special Character) but must be different from CMD_TRIGGER Var value.
eg. $
19. FINISHED_PROGRESS_STR
To change the Progress Bar of Download and Uploads, you must fill Single text of filled bar line of character which can be shown in Finish bar.
You can Select any character from these listed sites:
20. UNFINISHED_PROGRESS_STR
To change the Progress Bar of Download and Uploads. You must fill Single text of Unfinished bar line of character which can be shown in Unfinished bar.
You can Select any character from these listed sites:
21. CUSTOM_PACK_NAME
While you use kang command it will use "@username's kang pack: Vol 1" as Sticker Pack Name. You can set Custom Stick PAck name by filling this var value.
22. ALIVE_MEDIA
You can set your own custom media for alive command.
Only these formats can be accepted for this Var value.
A link to message (Only Message link)
https://t.me/theuserge/8Chat and Message id separated by
|-1001454692938|8A telegraph link
https://telegra.ph/file/e912739114b56059a8cf3.jpg
23. HEROKU_API_KEY
To work some Heroku compatible modules, this var value required to Access your account to use die, usage and sleep commands.
You can fill this var using your API key or Authorization token.
You can get this value from:
24. HEROKU_APP_NAME
You have to Enter the app name which you gave to identify your userbot in Heroku.
25. MAX_DURATION
Custom max audio(music) duration for video chat plugin. set MAX_DURATION in variables with your own time(seconds), Default to 900 seconds.
26. YOUTUBE_DL_PATH
Optional variable to use custom youtube_dl for utube.py, Default to youtube_dl, For more information type #ytdl in Userge OnTopic group.
27. CRYPT
Variable to use GDTOT for parser, get this by reading Help
28. APPDRIVE_EMAIL & APPDRIVE_PASS
Variables to use appdrive commands, get them from their site .
UserGe Modes
A mode defines the client, whether you want to use Userge on user account or as an Assistant bot.
This both also can be possible, Userge as a userbot and as an Assistant bot. You need to fill all vars for User Mode and Bot Mode. check Dual Mode
1. USER MODE
UserGe as a userbot with a user account requires this var.
SESSION_STRING
You can get this Var value using two ways.
The First Way:
- Get this using @genStr_Bot
The Second Way:
- Type
skipin the value while deploying the bot. - After deployed, You must off the Dyno from Resource tab.
- Then click on More in the top right corner and Run Console.
- In Console, Type
bash genStrand fill the details.
For more details, check this video: on 11:04 then 19:40 to 23:00
2. BOT MODE
UserGe as an Assistant bot to execute your commands only from the Bot.
BOT_TOKEN & OWNER_ID
BOT_TOKEN - Get it from @Botfather in Telegram.
OWNER_ID - Your user id (not username) Get it by using command
/idon the Group in the reply to your message where Rose Bot was added.
Make sure you've set up these settings while making bot via BotFather.
- Group privacy - Turn this OFF
- Allow groups - Turn this ON
- Inline mode - Turn this ON
- Add bot to your Log Channel
3. DUAL MODE
Use UserGe with both Userbot and Assistant bot.